057 From Sagging Rafters to Scissor Trusses — Restoring Strength Without Losing Space
Restoring an old building often requires more than replacing deteriorated materials. Sometimes the greatest challenge is understanding how the building was originally constructed, recognizing its weaknesses, and finding ways to improve it without sacrificing the features that make it useful and interesting.
One of my favorite examples comes from the restoration of an old garage building at Zehr Estate. What began as a project to correct a sagging roof eventually became an exercise in structural geometry, creative problem-solving, and applying carpentry lessons I had learned decades earlier.
And the most important discovery happened the evening before we were scheduled to begin construction.
A Garage Built for a Different Purpose
The original Zehr Estate dates to the nineteenth century, but buildings often change as the needs of their owners change.
Around 1950, when the estate was converted into an apartment complex, part of the garage structure was built or modified to accommodate additional parking for residents.
The arrangement included three garage spaces on the upper level and four below, with an apartment occupying part of the upper structure.
Over time, the roof began to sag, and the building's geometry needed correction.
We had already undertaken the considerable task of gradually bringing the structure back into alignment. But correcting the shape of a building is only part of the solution. We also needed to address the roof framing so the problem would not simply return.
The Original Roof Framing
The roof had been constructed using opposing common rafters, sometimes called coupled rafters, meeting at a ridge board.
A ridge board is different from a structural ridge beam. A conventional ridge board provides a connection and alignment point for rafters, but it does not necessarily support the roof's vertical loads independently.
In a traditional rafter system, properly positioned and connected rafter ties or ceiling joists can help prevent the rafters from pushing the exterior walls outward under load.
Our garage roof lacked adequate rafter ties or comparable structural restraint.
That was a concern because the new roof would be slate, a beautiful and exceptionally durable roofing material, but also a heavy one.
Based on a rough estimate, the slate alone may weigh approximately 12,000 to 15,000 pounds across the roof.
That weight, combined with snow and other loads, made strengthening the roof an important part of the restoration.
The Original Plan: Reinforce the Rafters
My first thought was to strengthen the roof using a more conventional triangular truss arrangement.
A traditional truss uses interconnected members to distribute forces through a defined structural system. The familiar triangular shape can provide an efficient way to span an opening.
However, a conventional truss with a horizontal bottom chord would have created another problem.
It would have reduced the available headroom inside the garages.
One of the features I liked about the building was the open space beneath the roof. Adding low horizontal members would have made the garage feel much smaller and less useful.
We were nearly ready to begin the reinforcement work, but the evening before, I found myself questioning the plan.
Something about sacrificing all that space simply did not feel right.
A Last-Minute Search Changes Everything
That evening, I decided to search Google Images for roof rafters and framing designs.
I was not looking for a particular product or a ready-made solution. I was hoping that seeing different approaches might spark an idea.
As I scrolled through the images, I kept thinking the same thing.
No, that will not work. No, I already considered that. No, that takes away too much space.
And then I saw something different.
It was a cathedral-style roof framing design.
I immediately recognized that the concept might solve my problem.
The design suggested a way to provide reinforcement without placing a horizontal member across the lower portion of the garage.
That image became the inspiration for a scissor-style framing arrangement.
Rather than simply copying the example, I began adapting the idea to the dimensions and conditions of our existing building.
Designing Around the Existing Structure
I enlarged the image and began sketching the framing on paper.
That evening, I took measurements from the garage and added the important dimensions to my drawing.
One of the challenges was that we were not constructing a new roof from scratch. We were working with existing rafters, roof boards, walls, and structural members that needed to remain in place.
My plan was to retain all the original rafters and reinforce them with additional lumber, using a scissor-style arrangement to preserve headroom.
The new members would be fitted alongside the old framing, with overlapping, sandwiched connections.
We also had another advantage: existing interior walls that could potentially help support the roof.
These walls separated the upper garage spaces and aligned with supporting walls in the lower level.
Instead of building new walls, I wanted to make better use of what was already there.
Following the Load Through the Building
One of the most important ideas in structural design is the load path.
Every roof must transfer its weight and other loads through framing members, connections, walls, and foundations to the ground.
Understanding that path can reveal opportunities to strengthen an existing structure.
In our garage, I added boards along both sides of the ridge board between the rafters, reinforcing the ridge area.
I also added a horizontal beam just below the ridge framing, providing a connection and bearing arrangement for vertical posts.
These posts extended downward to the existing walls separating the upper garages.
Because those walls aligned with walls below, the arrangement offered a potential additional load path through the building toward the concrete slab and supporting structure.
The purpose was to make use of the existing construction while improving the overall framing arrangement.
Of course, the effectiveness of any structural load path depends on member sizes, connections, bearing conditions, and the capacity of the supporting structure. Simply aligning framing members does not automatically establish their load-carrying capacity.
Building the Scissor-Style Reinforcement
The following day, Luke and I began cutting the lumber and making template pieces.
Templates were especially useful because the new framing had to fit the existing roof geometry.
We could test the pieces, make adjustments, and then use the successful patterns for additional assemblies.
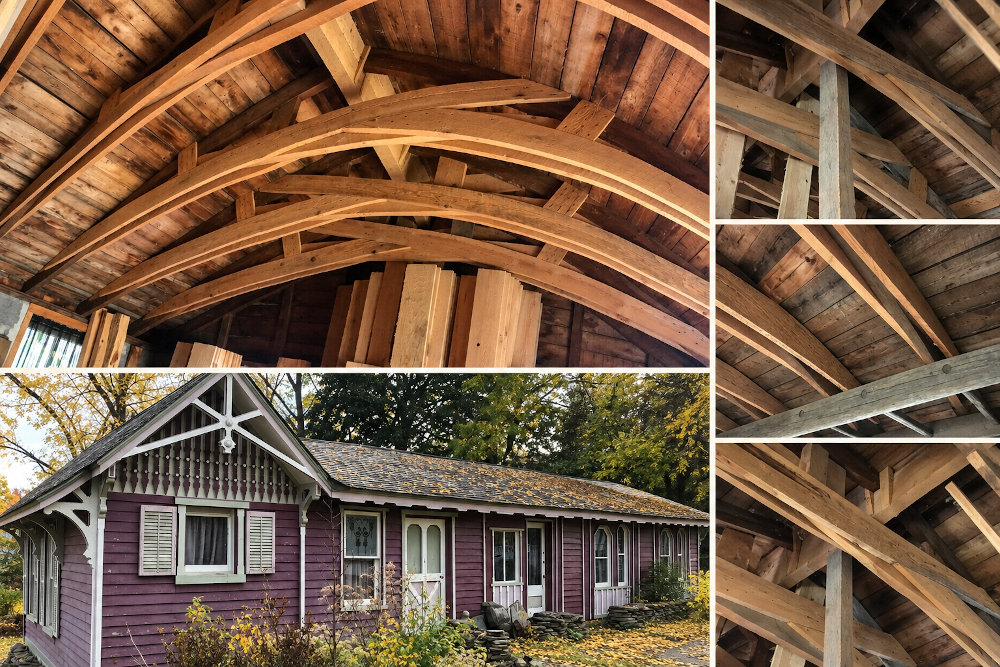
The original rafters remained in place. We added new lumber alongside them, creating reinforced assemblies with overlapping members and numerous nailed connections.
The angled lower members followed the general concept of scissor-truss framing, leaving considerably more open space than a conventional horizontal bottom chord would have allowed.
We also retained the cables that had been part of the earlier stabilization approach, repositioning them to make them less visually intrusive.
Our work was a custom reinforcement of an existing roof, inspired by scissor-truss geometry, rather than the installation of manufactured engineered trusses.
That distinction matters because the structural performance of a truss depends on its complete geometry, member properties, connections, and bracing.
Raising the Roofline
While preparing the reinforcement, I had already been gradually raising the sagging roofline at one end of the building.
That work made it possible to begin installing the first reinforced framing assemblies as the roof returned toward its intended position.
I also made an interesting decision about the final roofline.
Knowing that the slate roofing would impose a substantial load, I allowed the corrected roofline to finish approximately one inch higher than my target.
My thinking was that the framing might settle slightly after the roof was fully loaded.
As it turned out, I have not observed that anticipated movement.
Approximately fifteen years later, the roofline still appears to have maintained its position.
That has been a satisfying long-term observation, although the absence of visible movement does not by itself verify the structural capacity of a roof.
Understanding Different Types of Roof Framing
This project is also a useful opportunity to examine several common roof framing systems.
Common Rafters
Common rafters are individual sloping members that support roof decking and roofing materials. In conventional gable framing, opposing rafters meet at the ridge.
Where a nonstructural ridge board is used, properly designed rafter ties or equivalent structural arrangements are generally needed to control outward thrust.
Rafter Ties
Rafter ties are horizontal members connecting opposing rafters near their lower ends. They help resist the outward forces that can push supporting walls apart.
Ceiling joists can serve this purpose when properly positioned and connected.
Collar Ties
Collar ties are generally installed higher in the roof, near the ridge. Their primary conventional purpose is to help resist separation of opposing rafters under wind uplift.
They should not be confused with lower rafter ties, which resist outward wall thrust from gravity loads.
King-Post Trusses
A king-post truss is a traditional triangular truss containing a central vertical member, along with other members arranged to transfer forces through the structure.
King-post designs have a long history in timber framing and bridge construction.
Queen-Post Trusses
Queen-post trusses use two principal vertical members and can accommodate different span and framing requirements.
They are frequently associated with traditional timber construction and larger roof structures.
Scissor Trusses
A scissor truss uses sloping bottom chords that intersect or cross in a scissor-like arrangement.
Because the bottom chords rise toward the center, this design can create a vaulted or cathedral-style interior while maintaining a structural system designed to carry roof loads.
The exact arrangement of members, connections, and supports is critical to its performance.
Hip Roofs
A hip roof slopes downward toward the walls on all sides, rather than having the vertical triangular ends associated with a conventional gable roof.
Hip roofs introduce additional framing elements, including hip rafters and jack rafters, and require careful layout to maintain consistent roof planes.
Learning to lay out a hip roof became an important part of my own woodworking education.
Structural Ridge Beams
A structural ridge beam differs from an ordinary ridge board because it is designed to carry vertical roof loads to suitable supports.
When properly engineered and supported, a structural ridge beam can permit open or vaulted roof framing without relying on conventional low rafter ties.
It is another example of how different framing arrangements can solve similar architectural challenges.
A Lesson From a Master Barn Carpenter
My understanding of roof framing began long before the restoration of this garage.
When I was a senior in high school, we were building a garage with a farm-style hip roof.
My father asked Sam Zehr, an experienced carpenter with a strong reputation for building barns, to come and show me how to lay out the roof.
Sam had worked on large barns and understood how to construct strong, practical framing.
He laid out the first rafter, explained the geometry, and showed me how he approached making the framing especially strong.
Then he left the remaining work to me.
After he was gone, I began taking apart the initial layout.
My father saw what I was doing and asked why I was changing the work Sam had just shown me.
I explained that I thought the roof peak was going to be too high for the garage. I believed we could lower it to approximately fourteen feet and still have plenty of room.
Seeing the expression on my father's face, I reassured him.
"No worries, I know how to do it now."
I had understood the principles Sam taught me and felt confident adapting the geometry to the building.
Later, after we had erected the rafters, my father looked at the roof and agreed that the lower peak was a better choice.
That experience taught me something beyond how to calculate and cut roof rafters.
It taught me the value of understanding why something works, rather than simply copying how someone else did it.
Applying Old Lessons to New Problems
Decades later, those same lessons influenced my approach to the Zehr Estate garage.
I understood the importance of roof geometry, the relationships between framing members, and the need to think through how a structure behaves.
But I also recognized that I did not have every possible solution in my head.
That is why the image search was so valuable.
It introduced a framing concept that I could consider alongside my previous experience.
Sometimes research provides an entirely new answer. Other times, it provides a small idea that becomes the starting point for a different solution.
In this case, the cathedral-style image helped me envision a scissor-style reinforcement that better suited the building.
It was the combination of research, experience, measurements, templates, and careful fitting that shaped the project.
Fifteen Years Later
Approximately fifteen years have passed since we completed the roof reinforcement.
The original rafters remain in place, the additional framing is still visible, and the headroom that I wanted to preserve is still there.
The roofline has shown no noticeable settling during that time.
For me, the most satisfying part is that we found a way to improve the building while retaining its original framing and useful interior space.
Long-term observations are valuable in restoration work because they allow us to revisit earlier decisions and see how a building has behaved over time.
They are not a substitute for structural calculations or professional evaluation, especially where heavy roofing materials, modified framing, and custom connections are involved.
Nevertheless, seeing the building years later gives the project an additional chapter that would not have been possible to write when the work was first completed.
Restoration Is Also About Learning
Looking back, one of the most important decisions in this project happened before we cut a single piece of reinforcement lumber.
It was the decision to question my original plan.
I could have proceeded with the conventional arrangement I had been considering. Instead, I recognized that something about the design bothered me and spent an evening exploring alternatives.
That willingness to reconsider opened the door to a different approach.
It also reminded me how much of woodworking depends on knowledge passed from one generation to another.
Sam Zehr taught me how to think about roof framing when I was in high school. Years later, I was using that understanding while working alongside my son Luke on another building.
Different generations, different buildings, and different challenges, but many of the same underlying principles.
The best carpenters do not simply teach you where to cut the wood. They teach you how to think about the structure.
And sometimes, the most important tool in the workshop is the willingness to ask whether there might be a better way.
Note: This article describes a personal restoration project and its observed history, not an engineered framing design or construction instructions. Structural modifications should be evaluated for applicable loads, connections, bracing, and support conditions by a qualified professional.

Where the beauty of the wood does the work.
Brad Zehr | ZehrWoodartistry.com | brad@zehr.net